The purpose of this article is to serve as a guide for Publishers to begin using Product Pages. This guide will explain the basics of the steps required to create a Product Page. Product Pages have a variety of use cases and can be used in creative ways to group any related content.
All Documoto tenants have the Product Pages feature enabled at no additional cost. Admin Users must have access to the Content module in the Documoto Admin Center to create Product Pages
Article Topics
What is a Product Page?
Product Pages are a way to organize related content such as manuals, parts, and documentation into intuitive, model-centric views—empowering users to quickly find what they need even with limited search information. There is no single, correct way to use Product Pages, and Documoto is eager to learn how customers are using this feature so that we may share use case ideas in the future.
Once created, Product Pages can be accessed by searching in the Library for the Product Name, Product ID, or Product Description.
Steps to Create a Product Page
The steps, detailed below, should be followed to create a Product Page.
Step #1: Set Up Product Categories
Before creating the first Product Page, at least one Product Category will need to be created. Product Categories are a way to organize Product Pages. There is no single, correct way to use Product Categories. It is also acceptable to create and use only one (1) Product Category. Follow the steps below in the Documoto Admin Center to create a Product Category:
Before creating a Product Page, at least one Product Category will need to be created.
Follow the steps below in the Documoto Admin Center to create a Product Category:
- Within the Documoto Admin Center, go to: Content > Product Categories
- Click +Add
- Type the Product Category into the textfield.
- Click Save.
Step 2: Create & Configure Tags for Product Pages
When creating and/or configuring Tags, there is now a new entity type called "Product Pages". Tags are a way for end users to search and find content. Before creating the first Product Page, plan for Product Page tags by thinking about how your users typically search for content. For example, do they search by model, product line, or serial number? The way content is organized on the company website is usually a good indicator of how end users look for content.
If you're wanting more insight into how your end users search for content, please see the Users Search Report in Data Insights.
Before creating a Product Page, complete one or both of the tasks below:
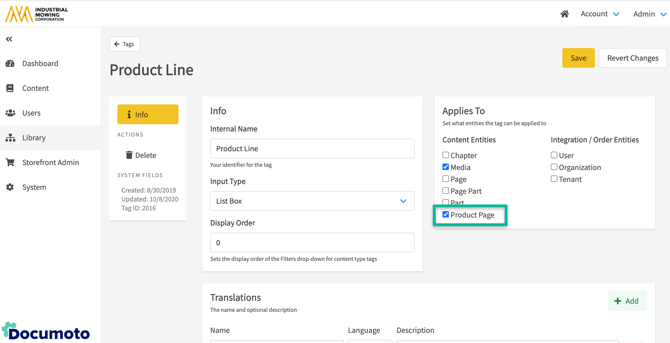
-
Edit an existing Tag (such as Product Line) to configure the Applies To section so that Content Entity 'Product Page' is selected.
-
Create a new Tag and be sure to configure the Applies To section so that Content Entity 'Product Page' is selected.
Product Page tags might be commonly shared with other content entities such as Media or Parts.
Step 3: How to Create a Product Page & Relate Content
To create a Product Page in the Admin Center...
- Go to Content > Product Pages
- Type the Identifier into the textfield
- Select the Product Category from the dropdown.
- Type the Product ID into the textfield
- Type the Name of the Product Page into the Name textfield, under Translations (Add translations as needed)
- Click Save
Identifier Considerations:
As you plan your identifier conventions, it is important to understand the difference between Identifier and Product ID.
- Identifier is not displayed within the Documoto Library. This value is viewable and searchable in the Admin Center only. This must be a unique value.
- Product ID is meant as the main way that end users will search for the Product Page. This ID is searchable in Library and displays anywhere the Product Page appears including Search Results, Favorites, Related, Recently Viewed, and Recently Added.
Product ID is not required to be a unique value, meaning multiple Product Pages could have the same Product ID. It is important to plan your ID conventions prior to building out Product Pages to avoid mismanaging the data set and causing end user confusion due to different Product Pages having the same Product ID.
To Relate Content to a Product Pages...
- Go to Content > Product Pages and open an existing Product Page
- Click Assign Media in the sub-navigation menu
- Click +Add
- Search for and select the check boxes next to the Media you wish to relate to the Product Page
- Click Select and Close
Step 4: Set Access Controls on the Product Page
When setting Access Controls on a Product Page, it must be assigned to:
- At least 1 (one) Organization
- At least 1 (one) User Group
Access controls use reverse inheritance. If a child organization (e.g. ABC Dealer) is granted access, its parent organization (e.g. Dealers or OEM) will automatically inherit access to the same media. For details, refer to: Best Practices and Considerations for Access Controls
To assign access to Organizations, In the Documoto Admin Center...
- Go to Content > Product Pages and open an existing Product Page
- Select Access Controls from the sub-navigation menu
- Select the Organization(s) that you want to assign using one or more of these methods:
- Manual Selection:
- Check the box next to each Organization you want to assign access to
- Bulk Selection:
- Click Bulk Apply to All Orgs to select all Organizations
- Click Bulk Remove from All Orgs to clear any selected Organization(s)
- Selection Tools:
- Use the Filter search bar to search or filter the Organization list
- Adjust the Organizations View dropdown to:
- Org Name Only: displays the Organization Name only
- Org & Parent Names: display the Organization Name and the Organization's Parent Organization Name
- To view the Organization hierarchy (for inheritance considerations), go to: Admin Center > Users > Organizations, and click Rearrange
- Manual Selection:
Then, assign Access to User Groups by clicking the checkbox(es) next to the User Groups that should have access. You can also select All or click None to clear selections.
Product Pages Optional Configurations
The following configurations are available in the Admin Center but optional.
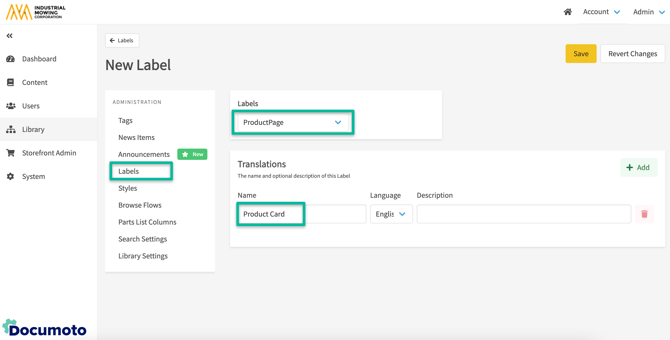
How to Create a Label for Product Pages
If desired, Product Pages can be renamed via Labels. To create a Label for Product Pages in the Documoto Admin Center...
- Go to Library > Labels
- Click +Add
- From the dropdown, select Product Page (a second label should be made for Product Pages for consistency)
- Type the Name in the Translations section
- Click Save
Labels can also be created for Product/Products and Product ID
How to Configure Search Options for Product Pages
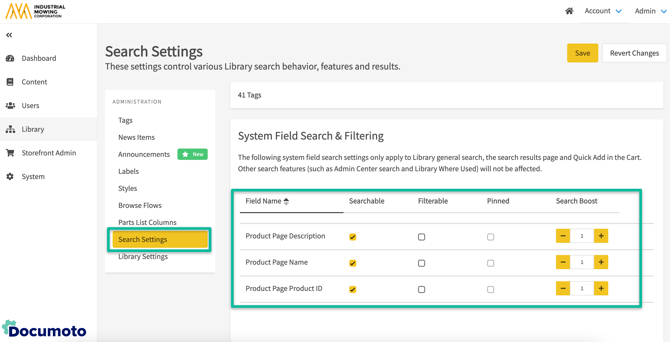
The following Search Settings impact Product Pages and have been enabled as Searchable by default:
- Product Page Description
- Product Page Name
- Product Page ID
To configure Search Settings in the Documoto Admin Center, go to...
- Library > Search Settings
- Scroll to the System Field Search & Filtering section
- Enable or disable Searchable and Filterable, Pinned, or Boost Product Page related fields as desired