How to Import a New Bill of Materials (BOM) for a Page
This article describes the steps to import a new Bill of Materials (BOM) for an interactive Page in Documoto.
Article Topics
- BOM Import Considerations & Best Practices
- How to Verify BOM List Settings
- How to Add a New BOM to a Page Using Clipboard
- How to Add a New BOM to a Page Using a Text File (CSV, TXT)
BOM Import Considerations & Best Practices
Prior to importing a BOM for a Page, consider the following:
- Export the BOM from the system it was created in (e.g. CAD, PDM, PLM, etc.) or extract the BOM from a source PDF file and input it in to a column-delimited file, such as: XLXS, XLS, CVS, TXT. For more information, please refer to this article: Options for Exporting BOMs from PDF.
- BOM Headers are optional but may help to streamline column mapping upon import.
- BOM data cannot be copy and pasted or imported directly from PDF or non-delimited sources.
- If you plan to copy and paste BOM data, verify that the clipboard is enabled for your web browser. For more information, please refer to this article: Enabling Clipboard for BOM Import.
- As a best practice, always enable the Lookup/Load Parts from Documoto on Import setting to ensure that existing Part data in Documoto, including Translations, Tags, and Hotpoint Links, is retained.
- By default, upon publishing new Parts Pages from Page Builder, Documoto will always overwrite existing Part Name Translation(s) with the latest Part Name Translation(s) included in the BOM. If you would do not want the imported BOM data to overwrite the existing Part Name Translations you manage in Documoto, Documoto can enable a Lock Part Translations on Publish system setting for you.
To enable the Lock Part Translations on Publish setting, please reach out to Documoto Support (support@documoto.com) or your Customer Success Manager
How to Verify BOM List Settings
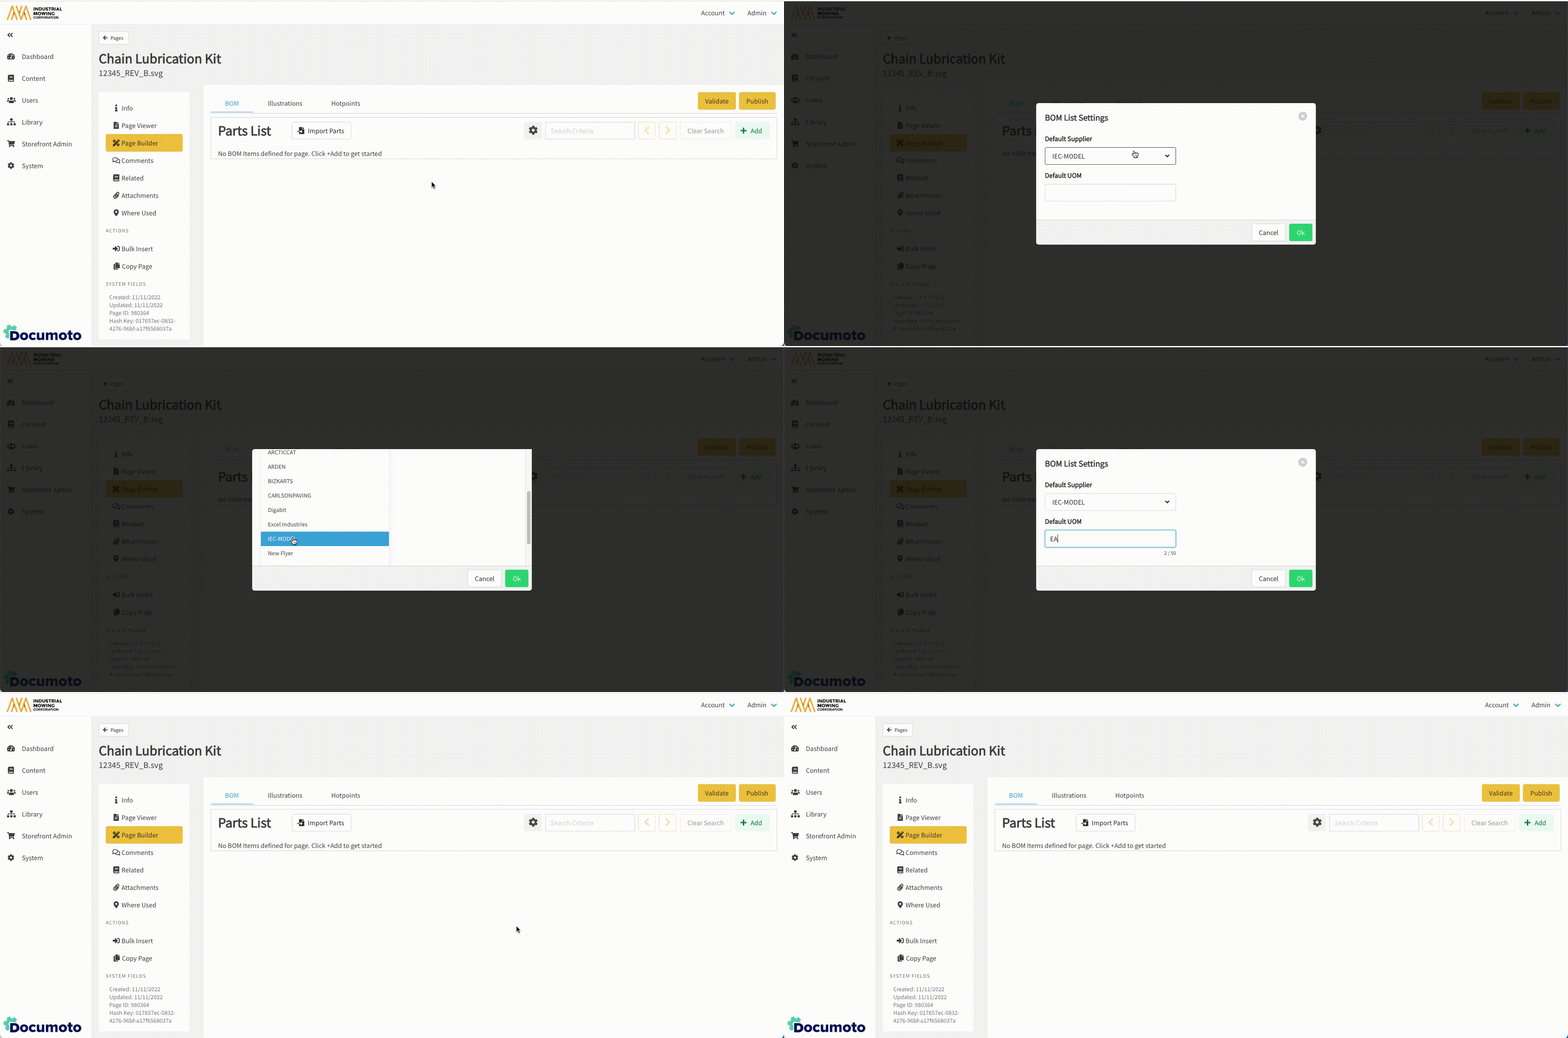
Before importing a BOM for a Page, verify that the BOM List Settings are correct.
- In the Admin Center, go to Content > Pages.
- Click + Add to create a new Page or search for and select the Page you wish to import a BOM for.
- Click Page Builder.
- On the BOM tab, click on the Cog icon to verify the BOM List Settings.
- Set a Default Supplier.
- Add a Default UOM.
- Click Ok.

How to Add a New BOM to a Page Using Clipboard
- In the Admin Center, go to Content > Pages.
- Click + Add to create a new Page or search for and select the Page you wish to import a BOM for.
- Click Page Builder.
- To verify BOM List Settings, click on the Cog icon on the BOM tab.
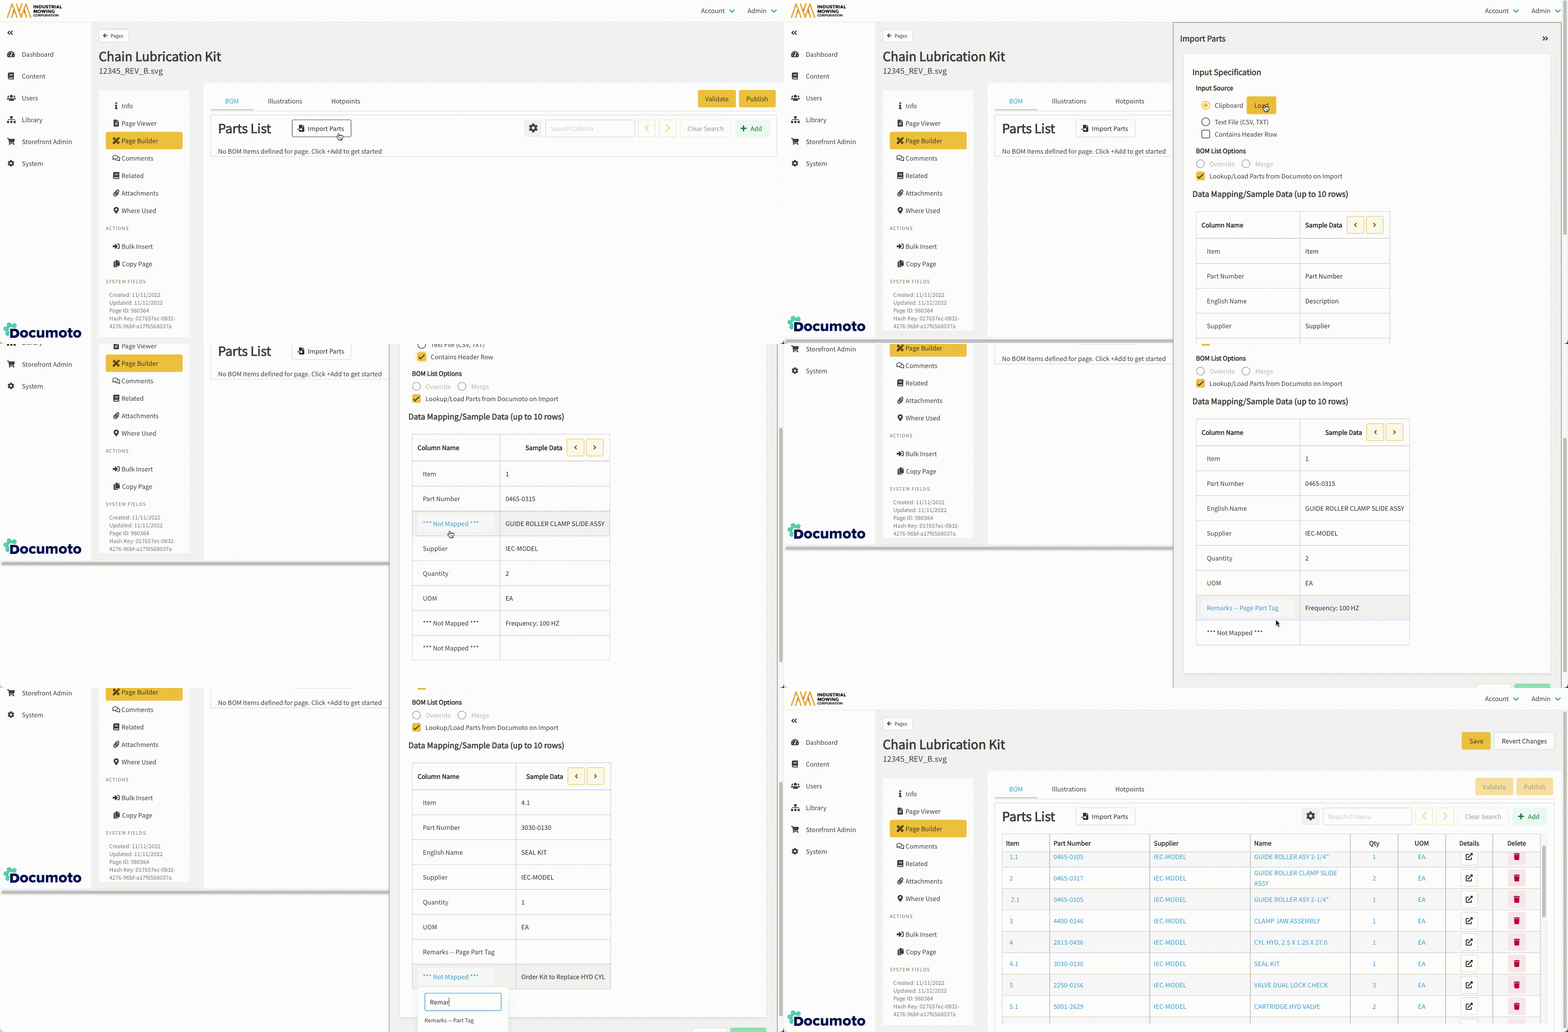
- Click the Import Parts button.
- The Import Parts slider will appear on the right.
- Select Clipboard.
- Copy the BOM table from the source file to your computer's clipboard.
- Click Load to load the BOM data.
- If the BOM table was copied with column headers (e.g. Item, Part Number, Name, etc.) enable the Contains Header Row checkbox. If not, leave unchecked.
- Under BOM List Options, ensure the Lookup/Load Parts from Documoto on Import checkbox is enabled.
- NOTE: if the Lookup/Load Parts from Documoto on Import checkbox is not enabled, Part data that exists in Documoto will not be loaded to the BOM - which may result in the Publisher unintentionally wiping out existing Part data, such as Tags and Hotpoint Links, upon publishing the Page.
- In the Data Mapping/Sample Data table, click on any fields in the Column Name column that indicate **Not Mapped** and map them to an available Documoto field name using the drop-down menu.
- NOTE: be sure to enable the Contains Header Row checkbox if your BOM table includes column headers.
- Verify that all Column Names have been mapped to the appropriate Sample Data using the directional arrows to preview up to 10 rows of BOM data. Update any Columns Names, as needed.
- Click Submit to import the BOM.
- NOTE: if the Submit button is disabled, ensure that all Column Names are mapped.
- Ident or rearrange BOM rows, as needed.
- Click Save.

How to Add a New BOM to a Page Using a Text File (CSV, TXT)
- In the Admin Center, go to Content > Pages.
- Click + Add to create a new Page or search for and select the Page you wish to import a BOM for.
- Click Page Builder.
- To verify BOM List Settings, click on the Cog icon on the BOM tab.
- Click the Import Parts button.
- The Import Parts slider will appear on the right.
- Select Text File (CSV, TXT).
- Click Browse to browse your local computer for a text file and select it by clicking Open. Or, drag a text file from your local computer and drop it in the allotted box.
- If text file import is successful, the source filename will appear in the allotted box to the right of the Input Source.
- If the imported text file includes column headers (e.g. Item, Part Number, Name, etc.) enable the Contains Header Row checkbox. If not, leave unchecked.
- Under BOM List Options, ensure the Lookup/Load Parts from Documoto on Import checkbox is enabled.
- NOTE: if the Lookup/Load Parts from Documoto on Import checkbox is not enabled, Part data that exists in Documoto will not be loaded to the BOM - which may result in the Publisher unintentionally wiping out existing Part data, such as Tags and Hotpoint Links, upon publishing the Page.
- In the Data Mapping/Sample Data table, click on any fields in the Column Name column that indicate **Not Mapped** and map them to an available Documoto field name using the drop-down menu.
- NOTE: be sure to enable the Contains Header Row checkbox if your BOM table includes column headers.
- Verify that all Column Names have been mapped to the appropriate Sample Data using the directional arrows to preview up to 10 rows of BOM data. Update any Columns Names, as needed.
- Click Submit to import the BOM.
- NOTE: if the Submit button is disabled, ensure that all Column Names are mapped.
- Ident or rearrange BOM rows, as needed.
- Click Save.
