
Hotpoints create the bi-directional interactivity between the BOM (Bill of Materials) and the Illustration on a Page.
Hotpointing can be added either:
- Programmatically (auto-hotpointing): Using OCR-based algorithms to detect and apply hotpoints
- Manually: By placing each hotpoint yourself
This article explains both hotpointing methods.
Article Topics
- Auto-Hotpoint Algorithms
- How to Auto-Hotpoint an Illustration
- How to Manually Hotpoint an Illustration
Auto-Hotpoint Algorithms
Auto-hotpointing uses optical character recognition ("OCR") algorithms to detect and apply hotpoints programmatically to vector or raster (e.g. PNG, JPG, GIF, TIF, pasted, etc.) images.
| Image File Format | Callout Type | Recommended Auto-Hotpint Algorithm |
| SVG | N/A | SVG Finder |
| Raster | Free-floating text and/or shape container | AI Scanner |
| Raster | Shaper container | Contour Shape |
| Raser | Free-floating text | Blob Finder |
How to Auto-Hotpoint an Illustration
Always review hotpoints for accuracy after auto-hotpointing or manual hotpointing
- Within the Admin Center, go to Content > Pages.
- Search for and select the Page you wish to auto-hotpoint.
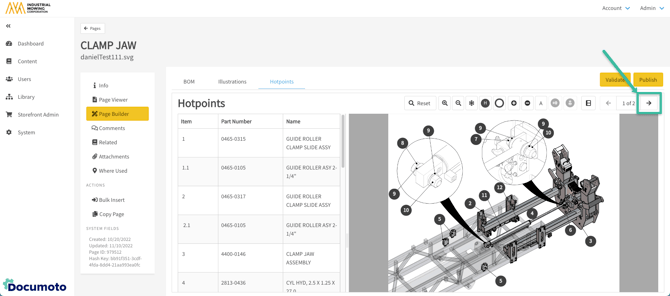
- Click the Hotpoints tab.
- Click the A button to enable auto-hotpointing.
- Select the auto-hotpointing algorithm that best fits your image type and callout typu

- If using Blob Finder or Contour Shape, the following settings must be configured:
- Min Area: Sets the minimum size that an item number could be in pixels.
- For example, if you set the minimum area to ‘1’ then the algorithm will search for item numbers as small as 1x1 pixels, and will likely hotpoint extra lines that are not actually item numbers.
- Start by setting your Min Area to 25 pixels.
- Adjust in increments of +/- 5 pixels until results appear accurate
- Setting Min Area too low (e.g. 1 pixel) may detect unwanted lines as item numbers
- Shape (Contour Shape Only): Selects the shape type surrounding the item numbers in the diagram.
- Min Area: Sets the minimum size that an item number could be in pixels.
- Click Process once all settings are configured.
- Review and adjust hotpoints
- Click on the Increase Hotpoint Size + icon to enlarge the hotpoints.
- Click on the Outline Mode O icon to toggle on/off the hotpoints and verify that they are numbered and aligned correctly.
- Drag hotpoints or use Shift + Arrow Keys to reposition hotpoints precisely
- If you have more than one illustration for this page, click the right directional arrow on the top right of the page to view the next illustration and follow steps 1-8 above.
- Continue to hotpoint all diagrams attached as illustrations to your page.
- Once all illustrations are hotpointed, click Save.
How to Manually Hotpoint an Illustration
Manual hotpointing is useful when:
- The source image or diagram quality is poor and prevents accurate auto-hotpointing result, or
- Auto-hotpointing works partially, but some callouts need manual correction
Always review hotpoints for accuracy after auto-hotpointing or manual hotpointing
- Within the Admin Center, go to Content > Pages.
- Search for and select the Page you wish to auto-hotpoint.
- Click the Hotpoints tab.
- Click the H button to enable manual hotpointing.
- Select an item number to hotpoint by either:
- Manually select the item number in the BOM by clicking on it
- Enter the item number into your keyboard (Page Builder will select it in the BOM)
- Click on the corresponding callout on the illustration where the hotpoint should be placed.
- Repeat steps #5-6 for all items in the BOM.
- Review and adjust hotpoints:
- Click on the Increase Hotpoint Size + icon to enlarge the hotpoints.
- Click on the Outline Mode O icon to toggle on/off the hotpoints and verify that they are numbered and aligned correctly.
- Drag hotpoints or use Shift + Arrow Keys to reposition hotpoints precisely
- Click Save.