
DocuLift is Documoto's new AI-powered PDF importer tool that will transform PDF data into Documoto's interactive Parts Page format.
DocuLift is currently in Early Access, so you may notice that some functionality is still being refined or expanded. We expect the experience to continue improving over time, and customer feedback is a key part of that process. We encourage you to share your feedback, source data, and any challenges you encounter so we can continue making the feature better.
For issues and challenges, please contact support@documoto.com or submit a support form.
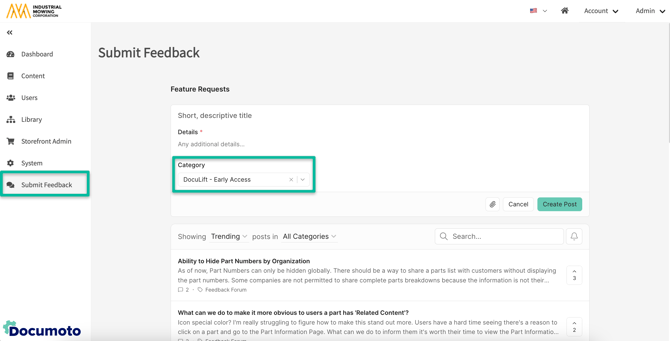
For suggested improvements, please use the Submit Feedback feature in the Admin Center of the Documoto App and select the Category "DocuLift - Early Access".
All Documoto customers have access to trial DocuLift through our "freemium" offering. DocuLift can be used to publish your first 200 pages at no cost. If you are interested in adding DocuLift to your subscription, please contact your Customer Success Manager for a quote.
Article Topics
DocuLift Workflow Overview
- Import a PDF for AI-assisted Extraction - submit a PDF and configure extraction settings
- Review Completed Import - open a completed import to view extracted content, displayed as page tiles.
- Prepare Candidate Pages - review pages, apply review statuses, drop pages, merge source page content into a target page, and edit and validate page details.
- Publish Candidate Pages (either to a Book or as standalone Parts Pages) - publish one page from Page Details or selected pages from Overview. Publishing can create new Parts Pages or overwrite existing ones based on page identity rules.
How to Publish Parts Pages from a PDF Using DocuLift
HOW TO IMPORT THE PDF:
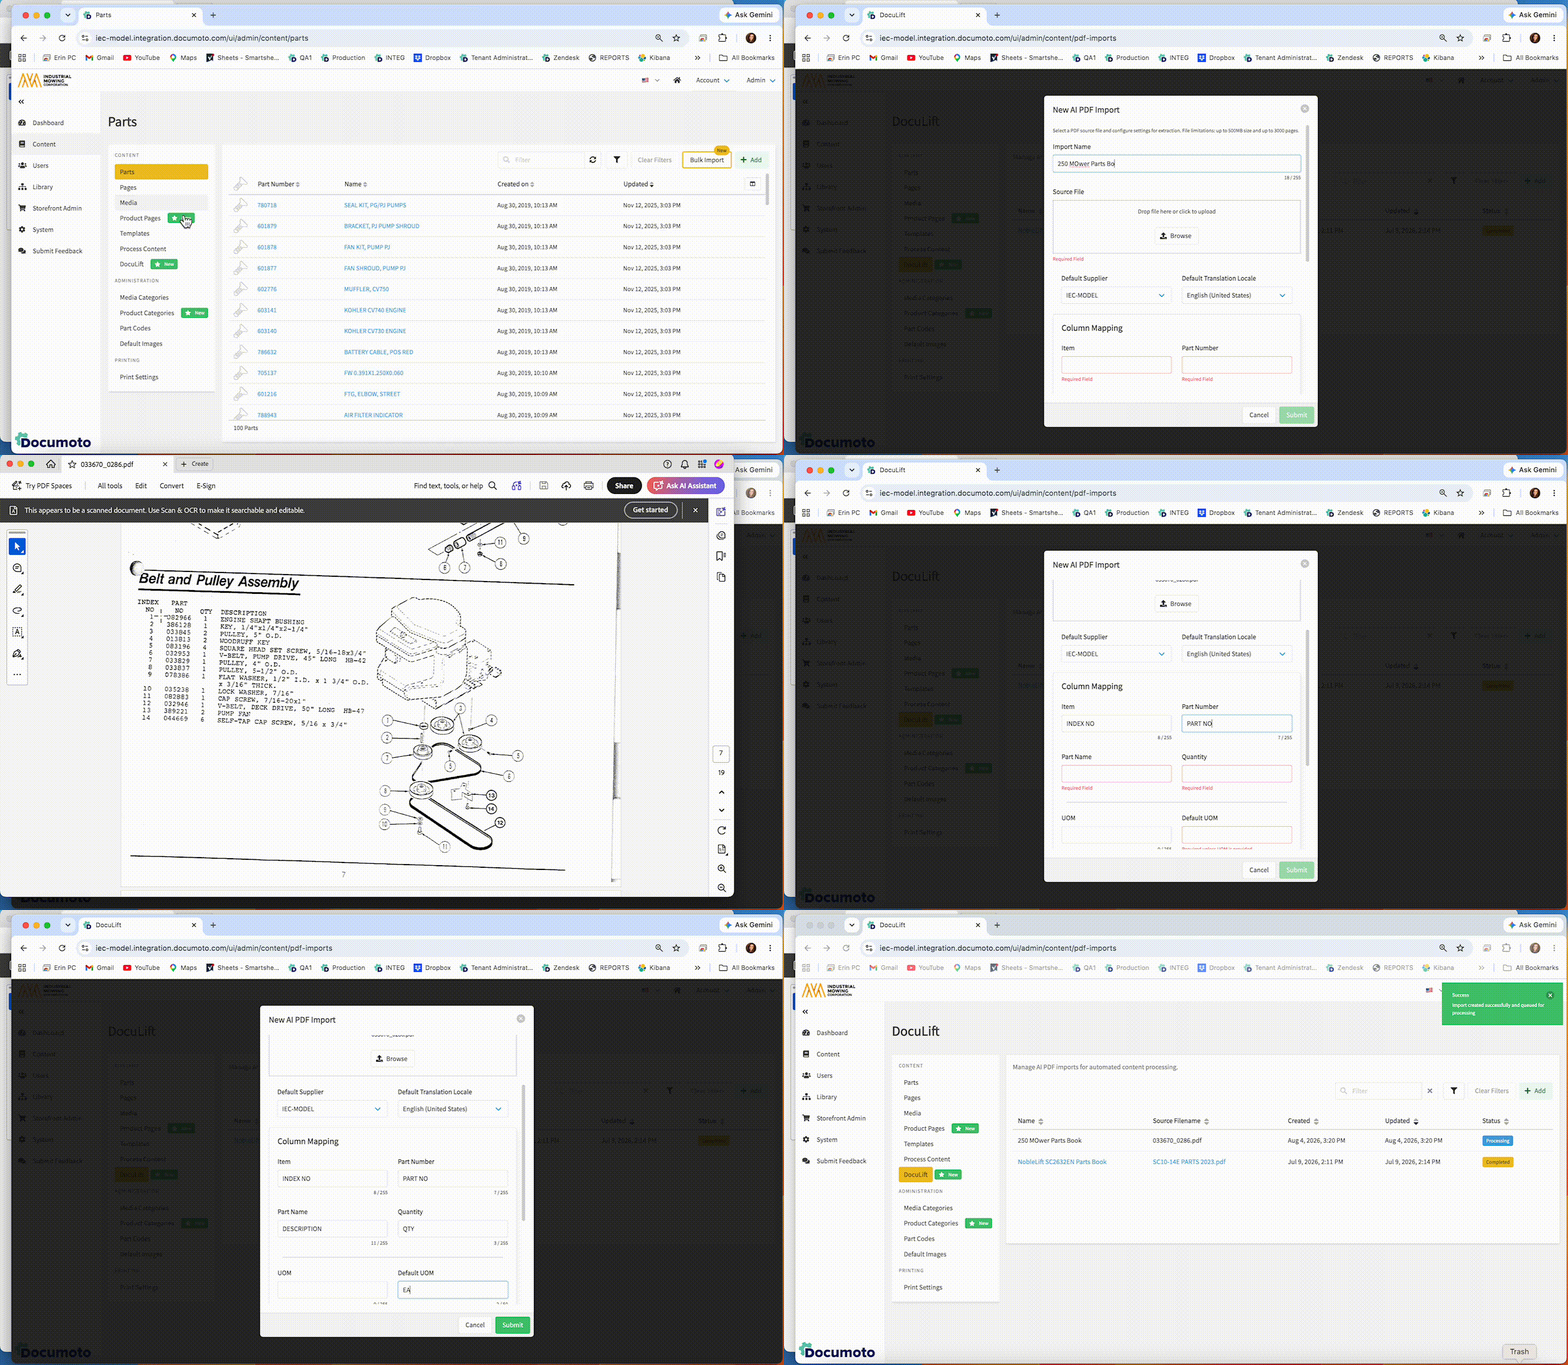
In the Documoto Admin Center...
- Go to Content > DocuLift
- Click +Add
- Type an Import Name (think of this as a job name, the end users will not see this)
- Add the Source File by either dragging and dropping or clicking Browse to Upload
- Set the Default Supplier and Default Language Code from the dropdowns
- Complete the Column Mapping - look at the Bill of Materials (BOM) headers in the source file and type them into each textfield
- Configure Page Part Tag information if applicable
- Optional: Set Default Part Number Code. (I.e. - REF for Reference)
- Click Submit
Note: PDF file limitations are up to 500MB and 3000 pages per PDF Import.
REVIEW THE COMPLETED IMPORT:
After the import has processed you will see a Completed flag next to the job. Click the Import Name to access the import and see the overview of imported pages.
HOW TO PREPARE CANDIDATE PAGES:
How to Drop Empty Pages
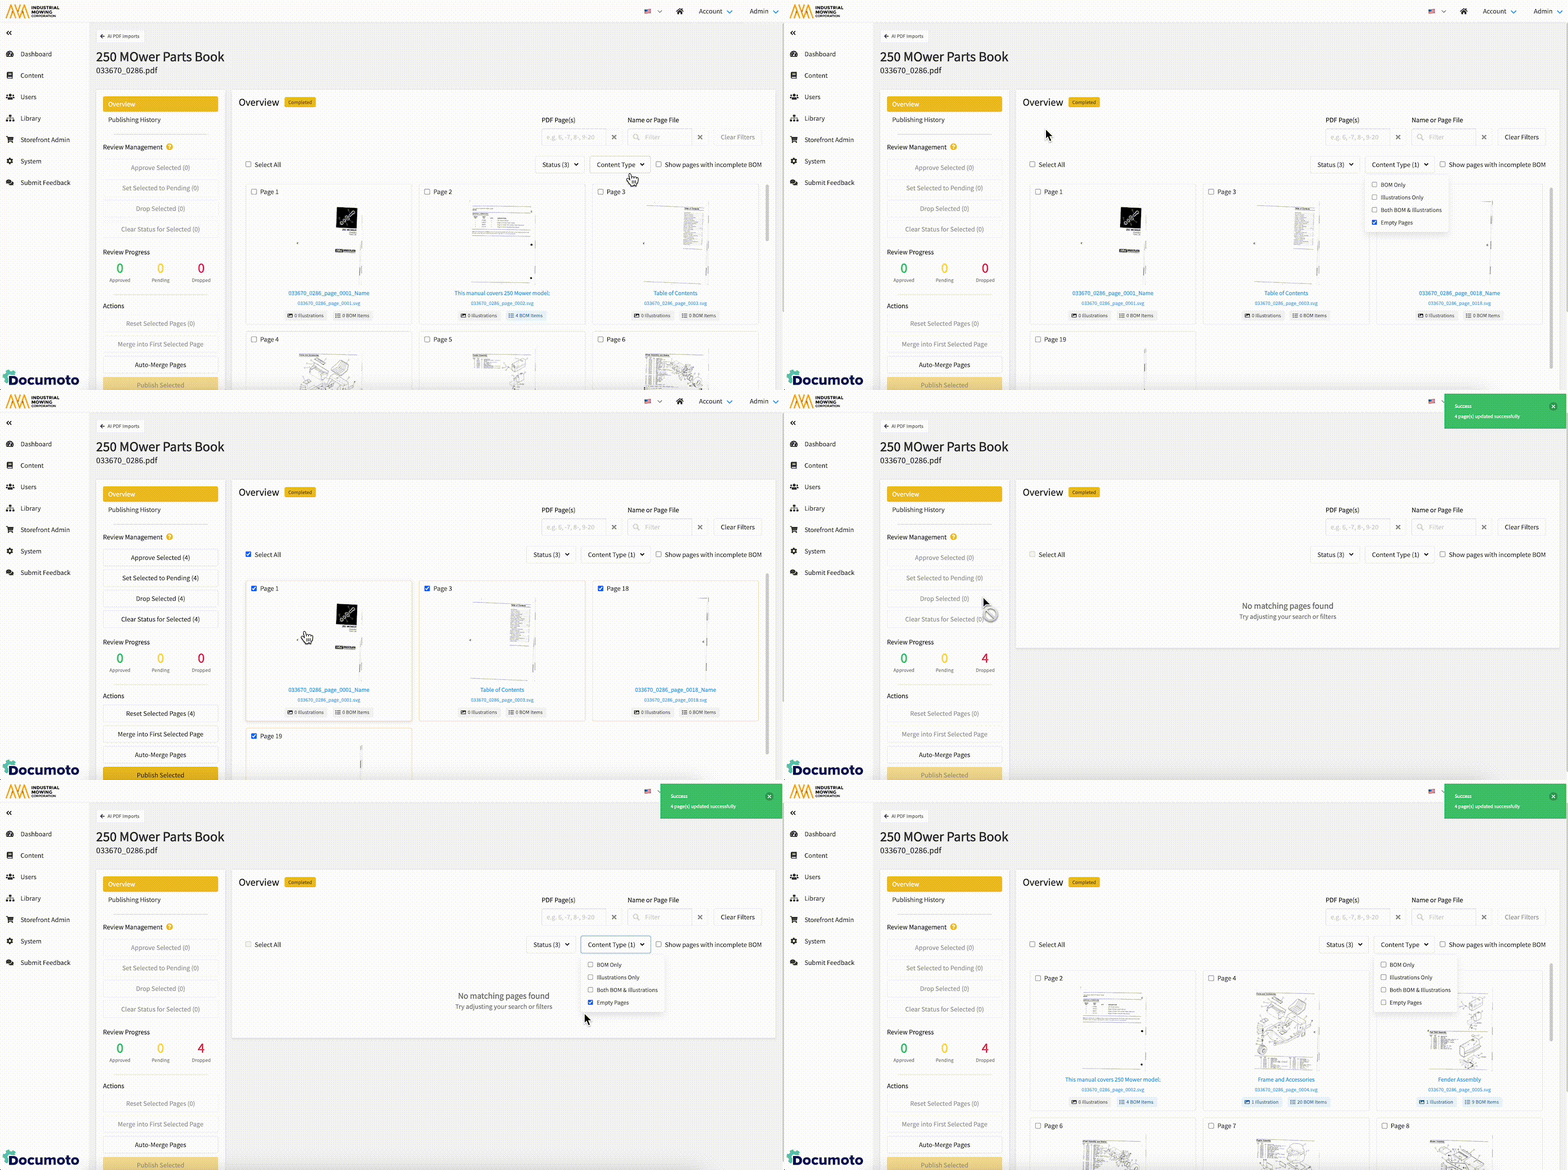
- Look for PDF pages that do not contain BOM or Illustration content. This can be done by selecting the Content Type dropdown > Empty Pages checkbox
- Validate that the pages shown should not be published
- Click Select All
- Click Drop Selected under Review Management
- Return to the Content Type dropdown and uncheck Empty Pages to see all Pages in the Overview again
How to Merge Pages
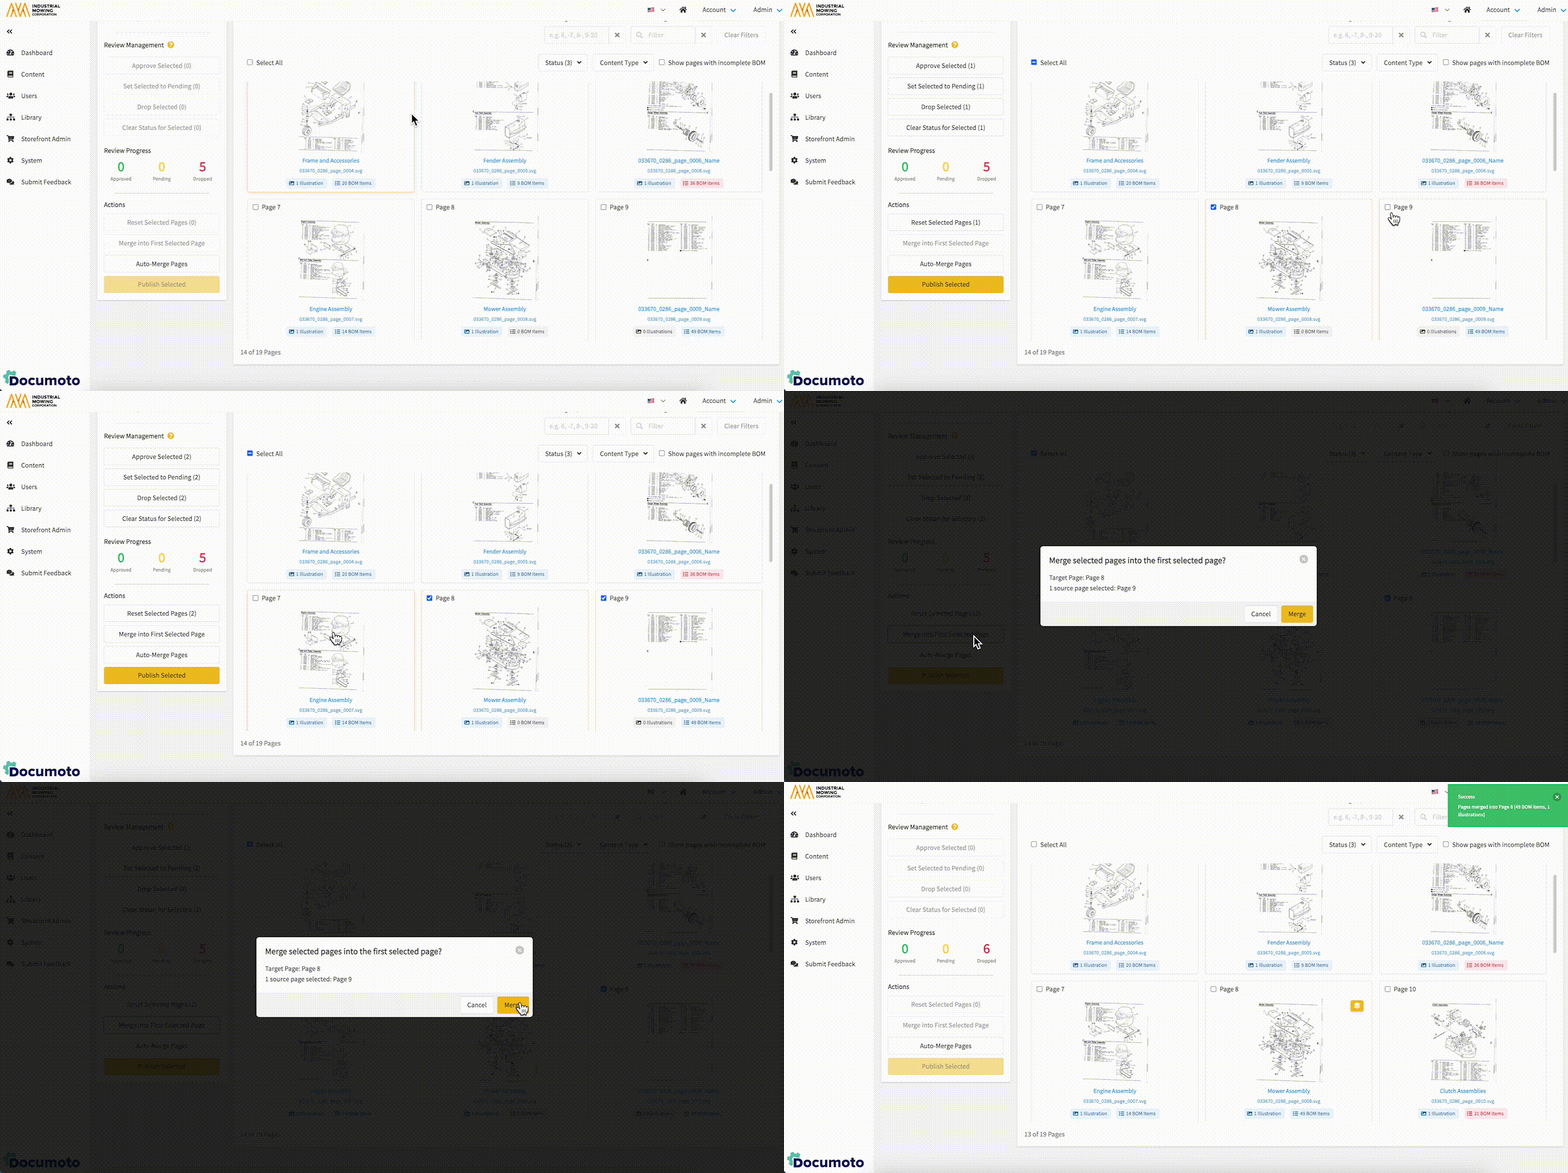
When an Illustration and BOM appear on 2 separate PDF pages, the Merge feature can be used to combine them into 1 Documoto interactive Parts Page.
- Look at the pages in the Overview to determine if any of the pages should be merged.
- Click the checkbox above the first page to merge (i.e. the illustration)
- Click the checkbox above the second page to merge (i.e. the BOM)
- In the left navigation menu, under Actions, click Merge Into First Selected Page
Auto Merge can be used on Pages that are clearly identified as the same in the source data. For example, the Illustration and BOM both have the same Page Name.
How to Edit and Validate Pages
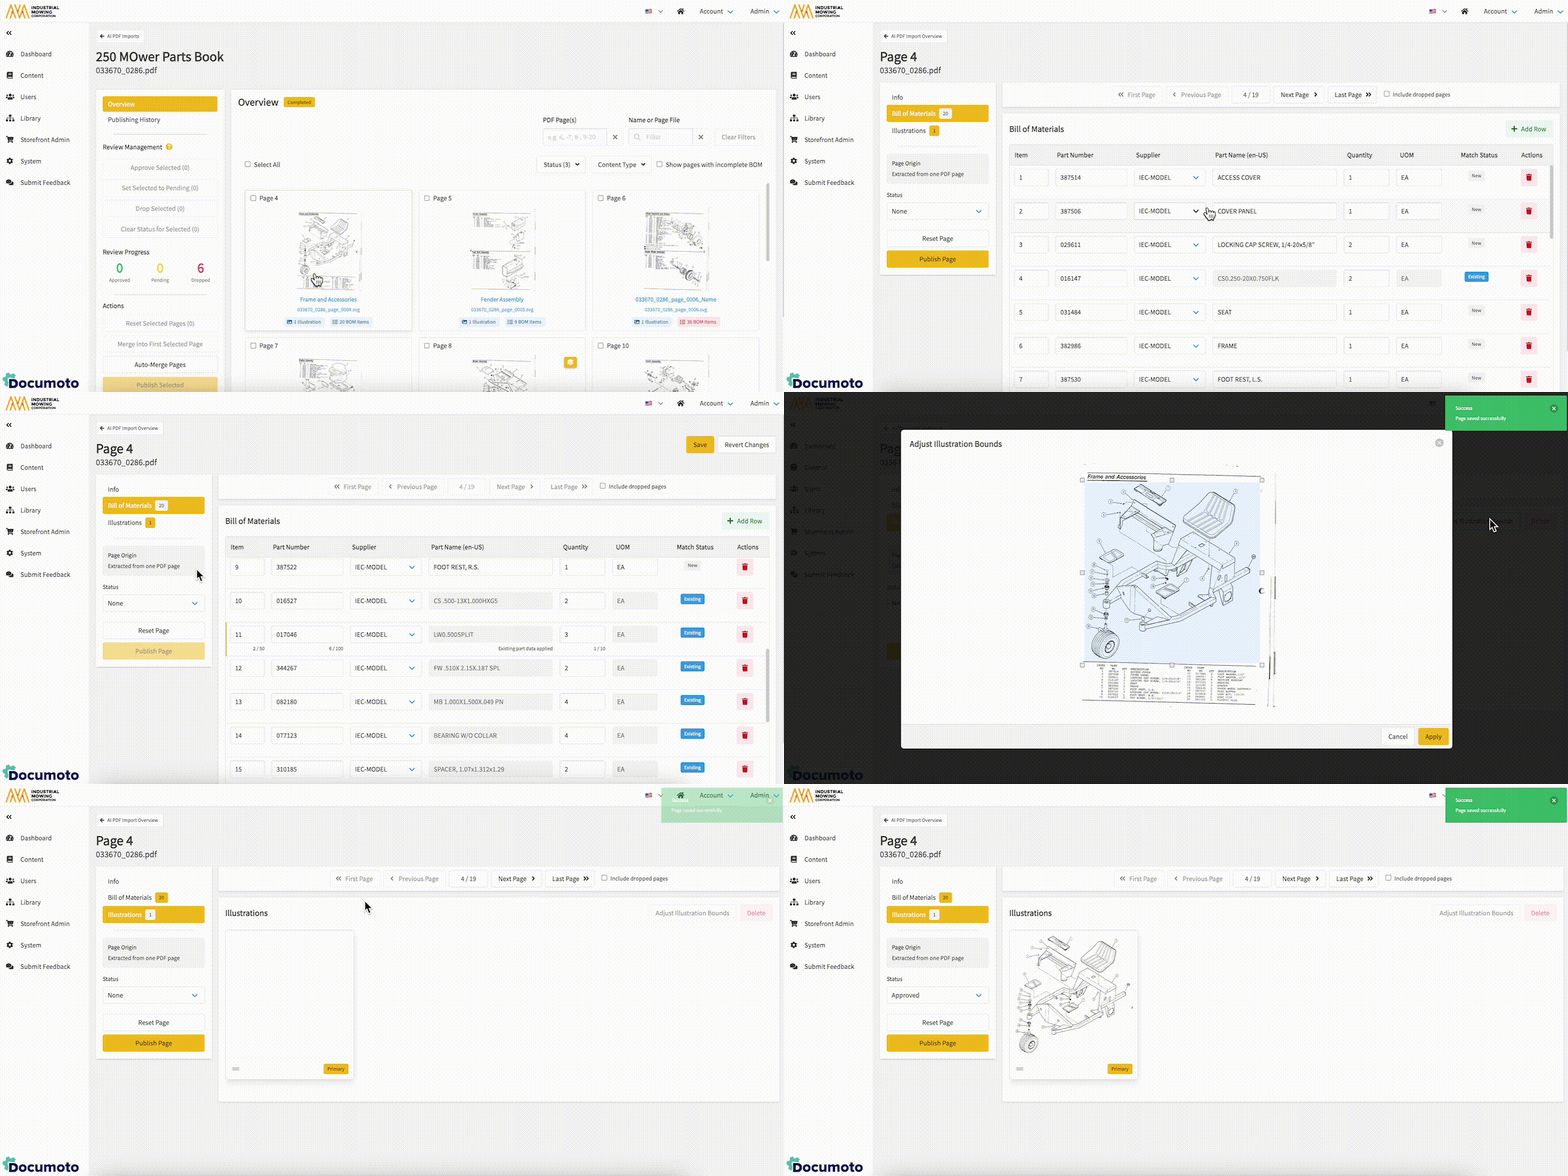
To view page details, click the Page Name under the page tile.
- Review the Page Info and make any desired updates to the Page File and/or Name
- Select Bill of Materials from the left navigation menu and review the BOM
- Edit part details as needed. Ensure that there is no missing BOM information or the page will fail to publish
- Save any changes made
- Select Illustrations from the left navigation menu
- Click on the Illustration tile and then the Adjust Illustration Bounds button to make adjustments
- Adjust the bounds as desired and click Apply
- Click Save
- When satisfied with the state of the page, select the Status dropdown and click Approved
- Continue this process by clicked Next Page at the top and editing/validating each page in the book
Approved, Pending, and Dropped statuses do not affect publishing. They are for tracking purposes only.
How to Identify and Edit Pages with Missing BOM Data
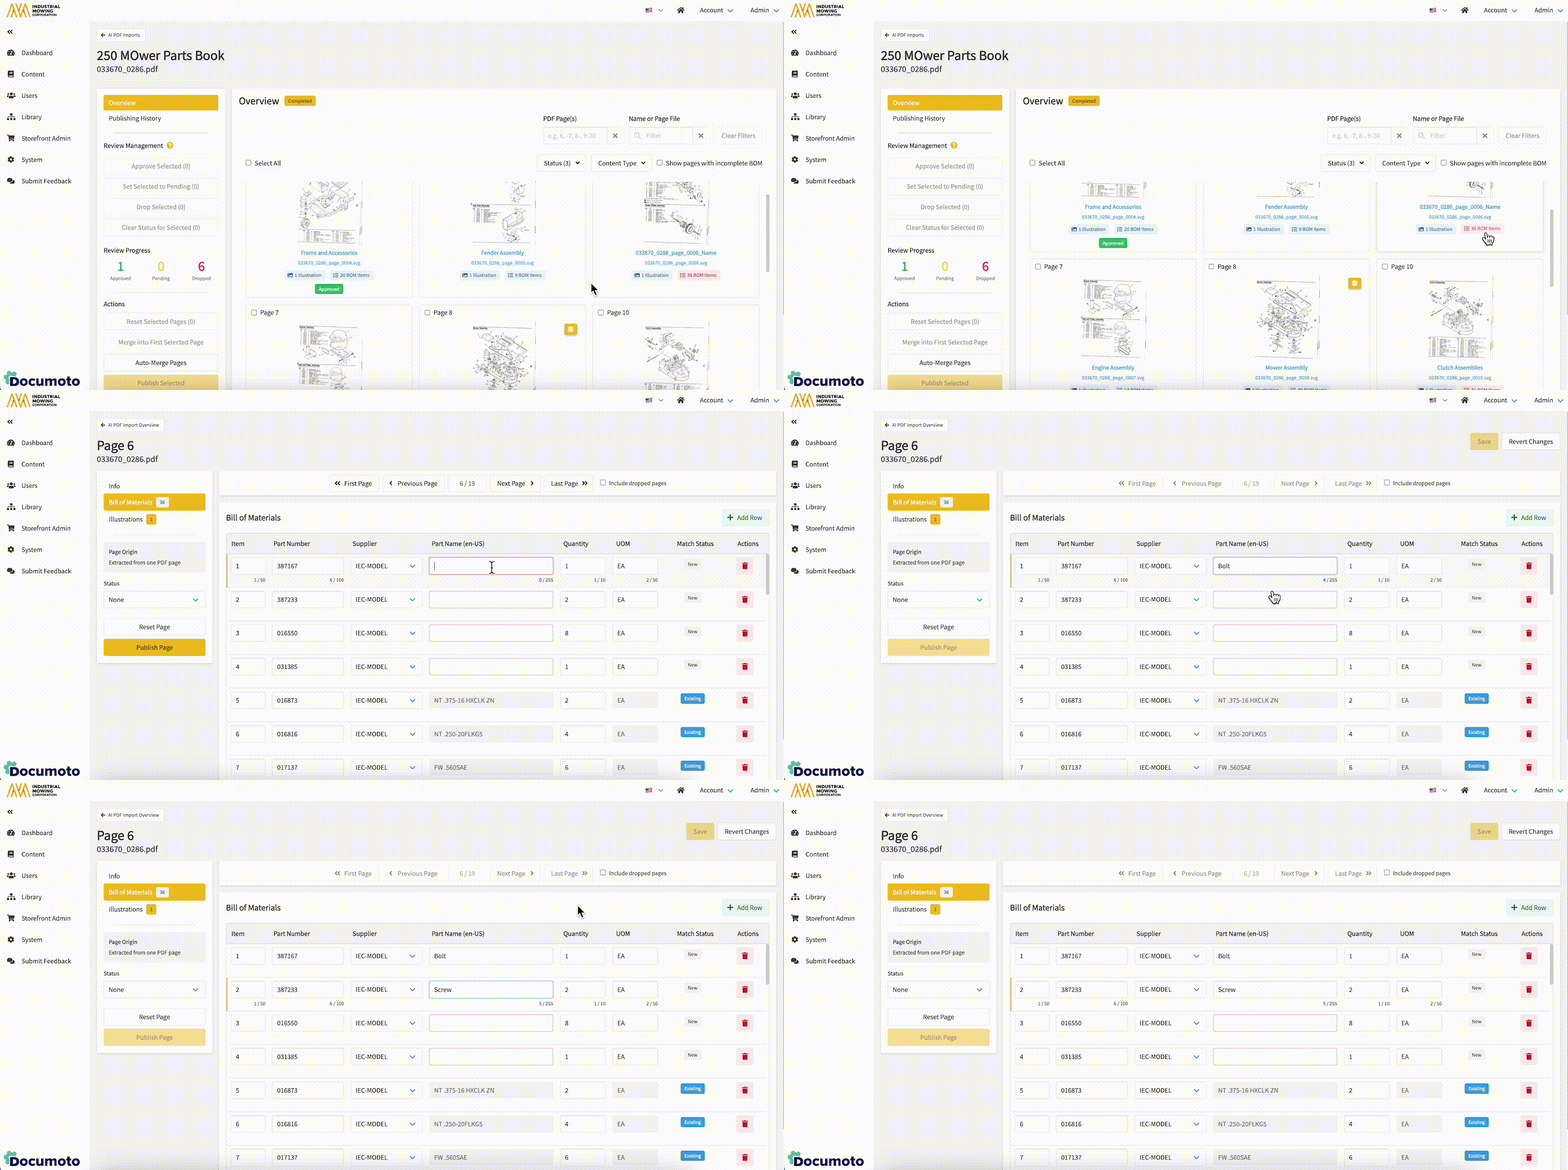
- In the Overview, look for page tiles that have a red BOM Items button under them
OR check the checkbox in the upper right to Show pages with incomplete BOM - Select the red BOM Items button to be brought to the offending BOM
- Review and Edit the Parts information - focus on completing the missing data, outlined in red
- Click Save
WARNING: If there is missing BOM data, the page will fail to publish.
HOW TO PUBLISH CANDIDATE PAGES:
How to Publish a Single Page
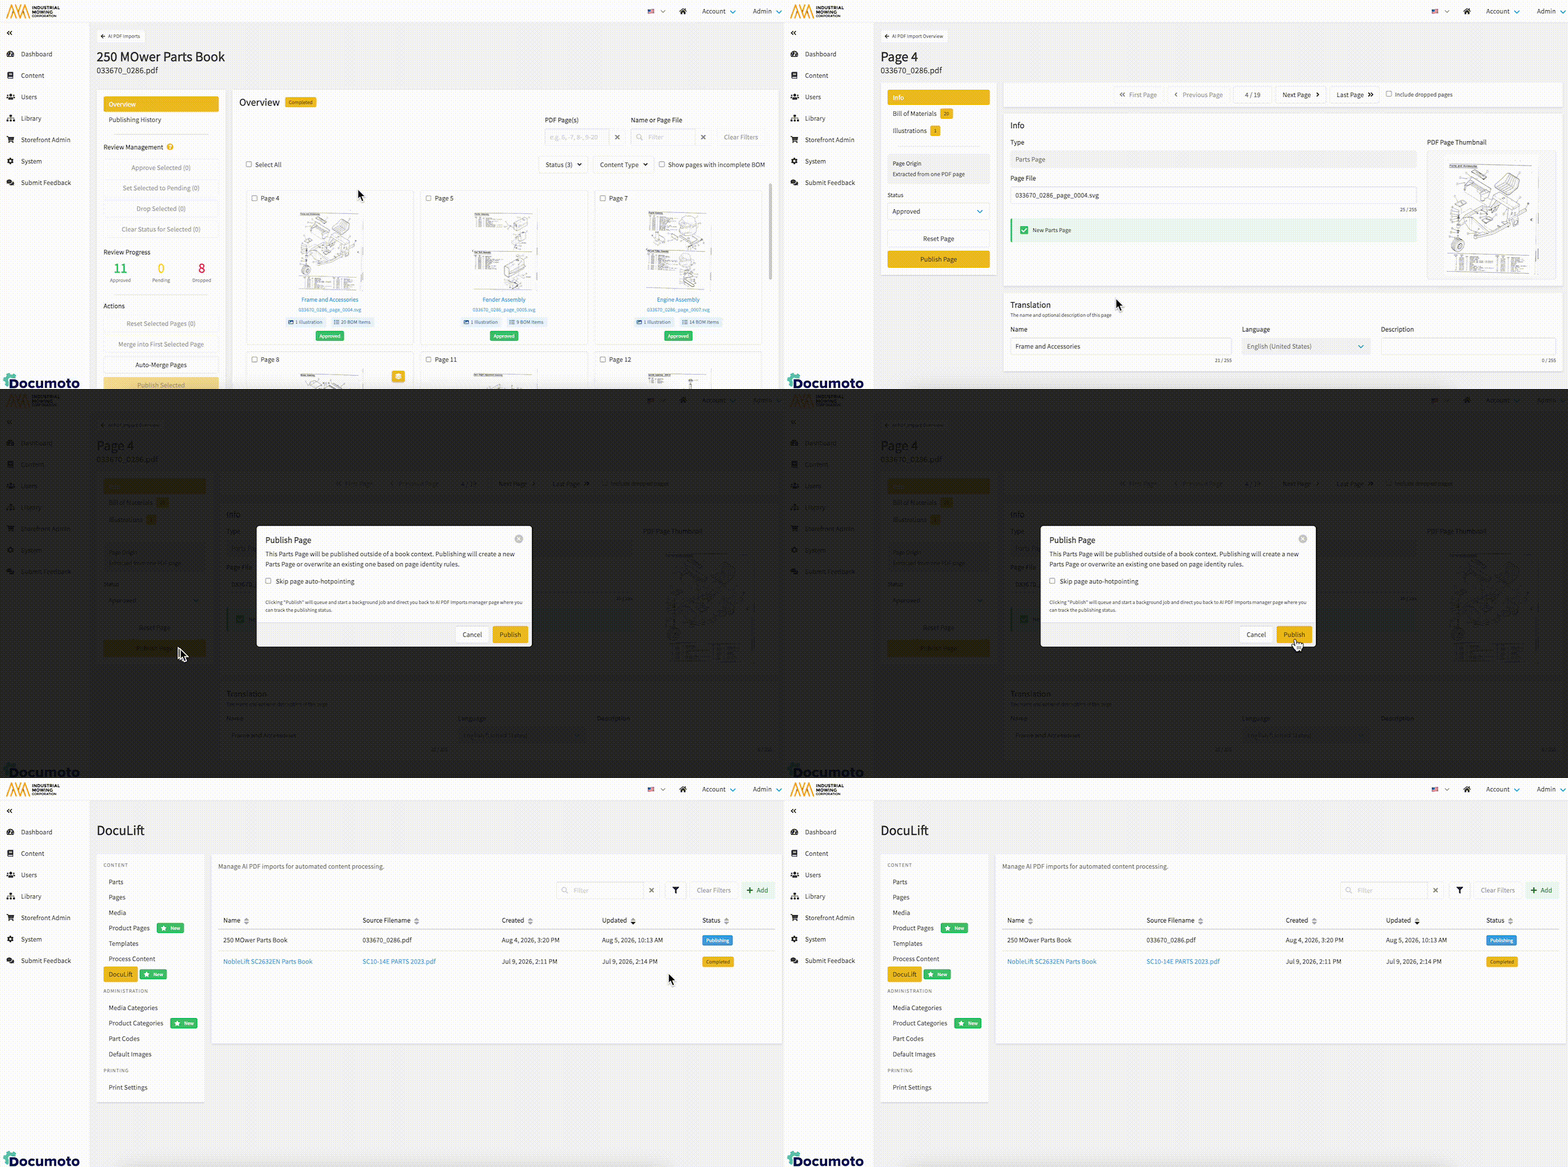
- Select a page from the Overview.
- Click Publish Page
- When the prompt comes up, click Publish
By clicking Publish, the Publisher is sent to the PDF Imports manager grid and it makes Imports locked / unavailable for changes and review until the job is completed.
Note: this page is being published as a stand-alone page. You can add it to a Book by going to Content > Media and adding it to the TOC of the target Book.
HOW TO PUBLISH MULTIPLE PAGES
How to Publish Parts Pages to a New Book
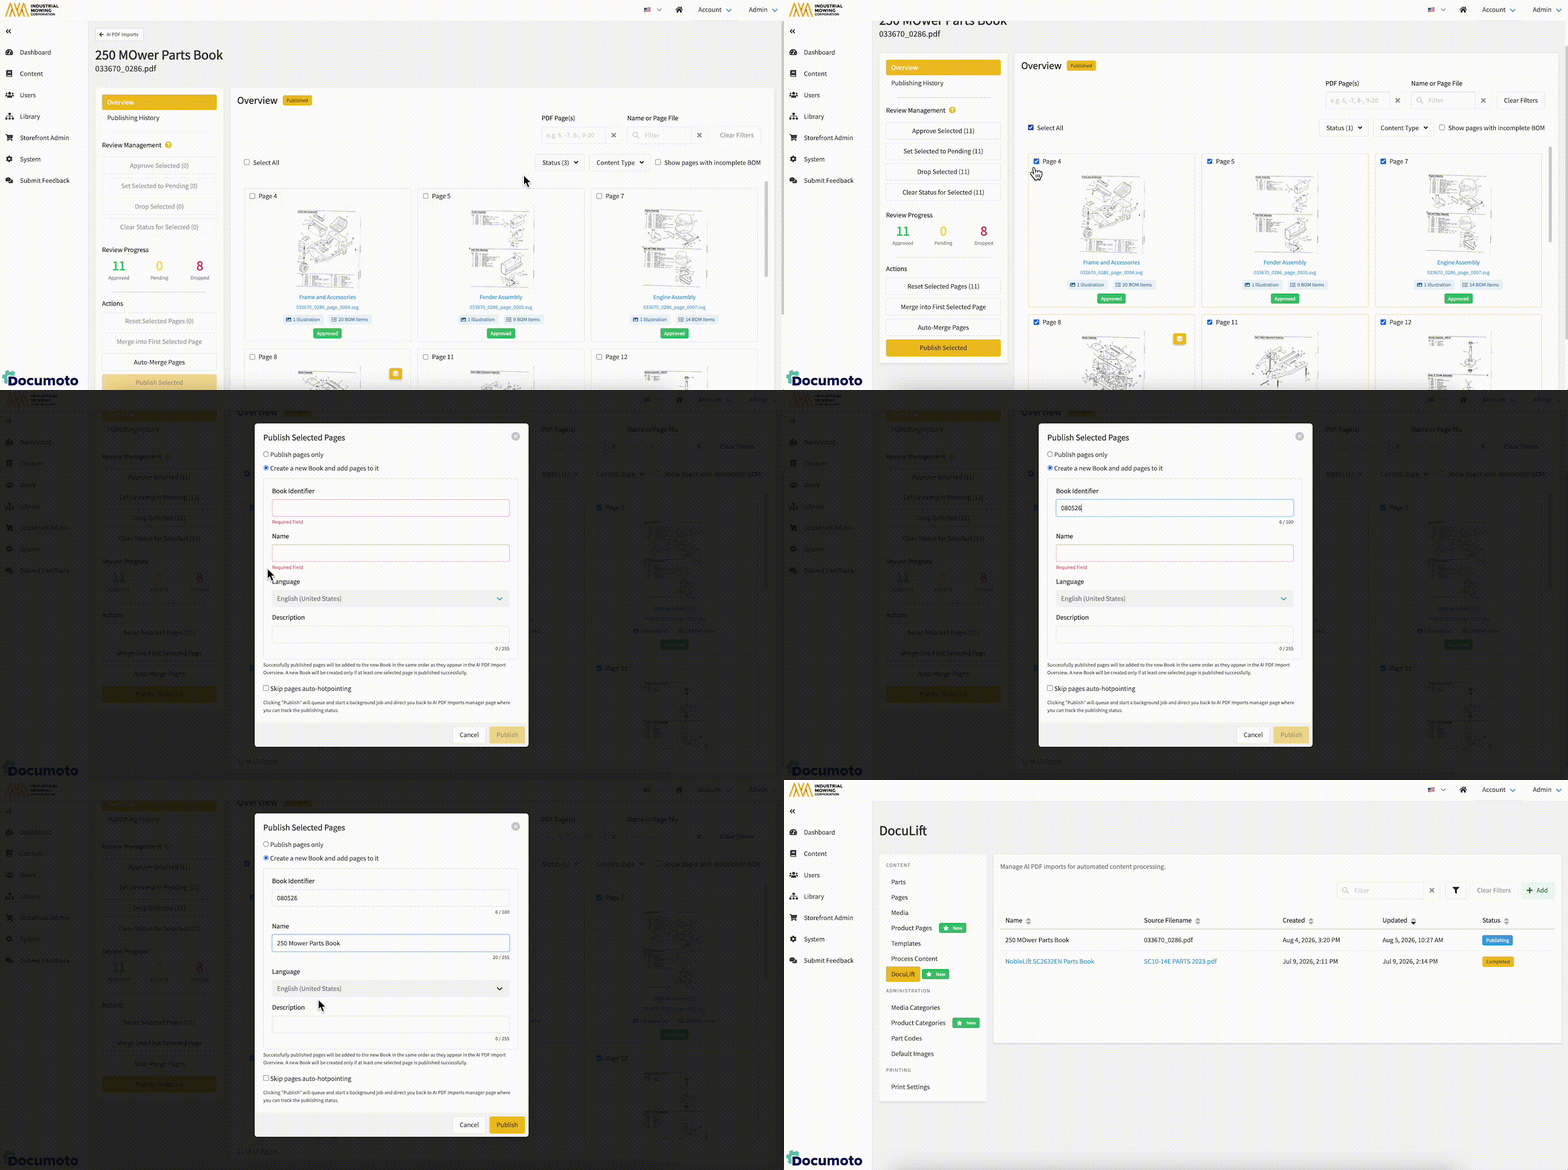
- If you have used the approval workflow, select the Status dropdown to view Approved pages only OR select all pages you wish to publish to a Book from the Overview
- Click the Select All checkbox to select all approved pages
- Click Publish Selected in the left-navigation menu
- Choose how you would like the pages published in the window. To create a book, select the button next to Create a new book and add pages to it
- Type a Book Identifier and Name into the text fields
- Click Publish
By clicking Publish, the Publisher is sent to the PDF Imports manager grid and it makes Imports locked / unavailable for changes and review until the job is completed.
Successfully published books are available in the Admin center via Content > Media. It is advised that you review the book's Table of Contents to ensure accuracy in Publishing.
Successfully published pages will be added to the new Book in the same order as they appear in the AI PDF Import Overview. A new Book will be created only if at least one selected page is published successfully.
Access Controls will need to be set in order to view this book in the Library.
How to Publish Pages Outside a Book
- Use the check boxes to select all Pages that you would like to publish
- Click Publish Selected in the left-navigation menu
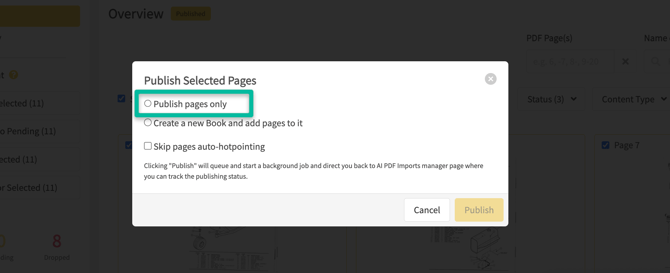
- Choose how you would like the pages published in the window. To publish pages outside a book, select Publish pages only
Resources
For a full demonstration of DocuLift, please view this previously recorded Webinar: Documoto Product Updates - 1H 2026 Webinar
DocuLift Documoto Academy Course is COMING SOON!
For more information or to add DocuLift to your Documoto Subscription, please contact your Customer Success Manager.